Cleaning Instruction
During Season Care:
- Before cleaning, be sure to turn off and unplug the unit.
- Keep the fan clean. Carefully wipe the unit with a soft, damp cloth. Please be very cautious near the motor.
- DO NOT immerse the fan in water and never allow water to drip into the Motor Housing.
- Never use gasoline, benzene or thinner. This will damage the surface of the unit.
- After cleaning, be sure to completely dry the unit with a cloth or towel.
After Season Care:
- Your fan can be stored in the off-season.
- Before putting the fan in storage, clean it thoroughly, cover it with a vinyl bag, and store it in a cool and dry place. We recommend using the original (or appropriately sized) box.
SETTING UP
- Carefully remove your fan from the box (please save the carton for off-season storage).
- Make sure the unit is in the OFF position before plugging the unit into the outlet.
- For shipping purposes, the fan is packed unassembled.
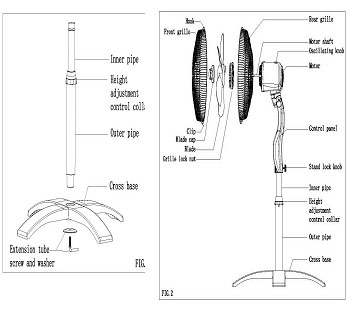
ASSEMBLY
- Unscrew the L shaped extension tube screw and washer from bottom of base tube.
- Mount the base tube to the base and secure by the extension tube screw (Fig 1).
- Pull the inner extension pole inside the large base tube up and tighten the height adjustment control knob.
- Place the motor assembly on top of small extension pole and secure with setting screw
- Remove the fan blade cap on the end of motor shaft by turning clockwise and rear grill setting nut in front of motor housing by turning counterclockwise.
- Set the rear grill in the proper position with the handle up. Secure the rear grill by using the setting nut to tightly attach it to the motor housing.
- Install the fan blade on the shaft until it reaches the retaining pin and tighten the fan blade cap counterclockwise.
- Mount the front guard in the proper direction and fix both guards together with the clips on the edge of the rear guard.
OPERATING
- Place fan on a firm level surface.
- Plug the power cord into any standard 120V AC, 60HZ outlet. Please make sure the Selector (Speed Control) is in the OFF position. A loose fit between the AC outlet and plug may cause over heating of the plug. Have a qualified electrician to replace the old outlet if the power cord feels extremely hot.
- Tilt and adjust the fan head to the desired angle or airflow.
- To adjust height, loosen the Height Adjustment Control Collar; adjust to the desired height and retighten.
- To make the fan oscillate, push down on the oscillating knob located on the top of the motor housing. To stop the fan from oscillating, pull up on the oscillating knob.
3 Speed Push Button Switch:
Push the switch key to the desired fan speed setting.